Original Link: https://www.anandtech.com/show/2664
Silverstone Fortress FT01
by Christoph Katzer on November 10, 2008 5:00 AM EST- Posted in
- Cases/Cooling/PSUs
Introduction
When it comes to high-end aluminum chassis, a few names come to mind. One name that should definitely be on your short list if you're interested in such a case is Silverstone. The Taiwanese manufacturer formed when a group of rogue engineers left Cooler Master to go their own way in 2003, and they have been building high-end cases and power supplies (and a few other products) since the split.
They recently introduced their new Fortress chassis series, and we will be looking at the black anodized version today. With this case, Silverstone follows the footsteps of Apple by producing the case - or at least the main frame - out of one piece of aluminum. That results in better stability as well as a cooler appearance since joints stay mostly unseen.
Silverstone chose to modify the cooling system relative to the ATX standard. The ATX standard says air needs to come into the case at the bottom front, which will allow airflow to cross over the mainboard and all the components, and then it will exit via the power supply and rear mounted fan(s). Minor tweaks in positioning of fans are one thing, but Silverstone mixes things up by having two large 180mm intake fans, one at the front and one at the top.
With more fans blowing air into the case, Silverstone creates higher air pressure inside the case, which in turn causes air to exhaust through every opening it can find. In the presentation on their website, Silverstone shows how the air will exhaust through the rear-mounted fan, the perforated side near the fan in the rear, and the front - again, wherever is an opening. One benefit of this design is that most of the air that enters the chassis will come through one of the two filtered fan intakes, reducing dust buildup and the interior. Silverstone has even posted a YouTube video demonstration.
There has been something of a debate among users for years about the best way to air-cool a case. Some people think it's best to have most of your fans as intake fans, creating positive air pressure -- like the Silverstone FT01. Others take the opposite view and feel it's best to have all of your fans exhausting air from the chassis, and there's the traditional matched intake/exhaust configuration that most cases use. Perhaps the best cooling setup depends on the overall case design, which is something we are working to test right now with the FT01. Initially, we will have results for the standard configuration of the FT01 that we can compare with other cases; however, we will update this article later today with testing results showing how reversing fan directions affects -- or perhaps doesn't affect -- cooling efficiency.
Specs
| Silverstone FT01 Specifications | ||
| Motherboard Form Factor | ATX, Micro ATX | |
| Drive Bays | External | 5x 5.25" |
| Internal | 7x 3.5" | |
| Cooling | Front | 1x 180mm intake |
| Rear | 1x 120mm exhaust | |
| Top | 1x 180mm intake | |
| Side | ||
| Bottom | ||
| Expansion Slots | 7 | |
| Front I/O Port | 2x USB, 1x IEEE1394, 1x Audio, 1x Micro | |
| Power Supply Size | Standard ATX | |
| Weight | 8.66kg | |
| Dimensions | 211 x 486 x 495mm (WxHxD) | |
Exterior
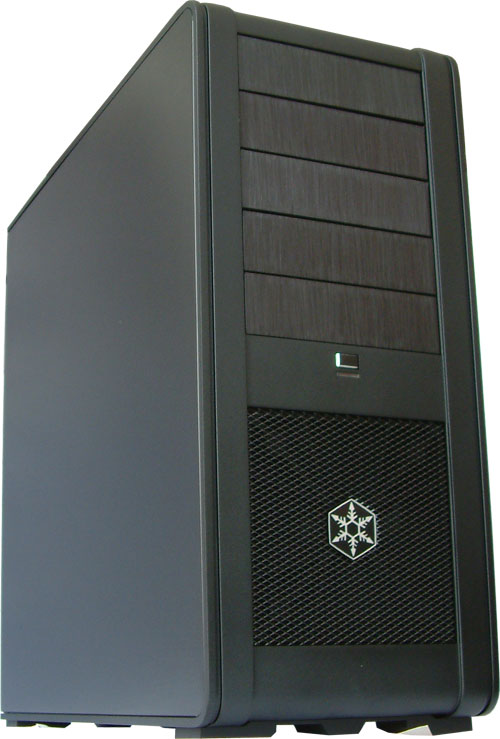
As mentioned, the main frame of the chassis is made out of one piece of aluminum. That makes this case look a little similar to the G5 from Apple, just without handles and perforated front panel. The front has a large cutout in the bottom covered by a metal grille with a Silverstone logo in the middle. The first 180mm intake fan sits behind this grille, and the power button is just above the grille in the middle of the front. The upper part of the front has five 5.25" covers, behind which you can install optical drives or other components.
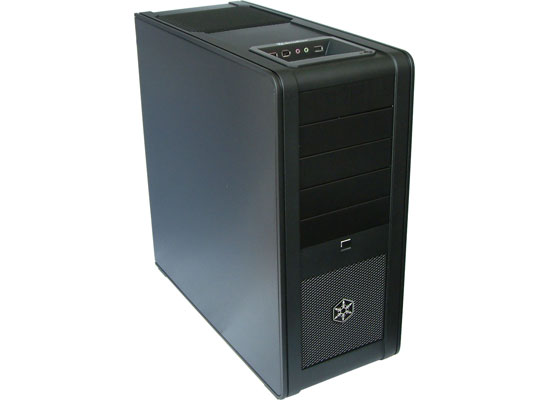


The top of the chassis features a recessed I/O panel that also sports the reset button. There is no plate/door blocking access to the I/O panel, providing easy access, but whether that's better will depend somewhat on personal opinion. Access is certainly easier, but it's also one more cranny where dust can build up, and if you have children in the house, it's sometimes nice to hide access to things like reset buttons. As far as dust is concerned, Silverstone angles the ports so that they are almost horizontal, so at least dust buildup inside of the ports will be kept to a minimum. However, during our tests we already noticed dust building up in front of the ports.
The back of the top panel has another large opening with a black grille. Behind that grille is the second 180mm fan, which will blow air into the case. You will want to make sure that you don't block this area, since that would obviously affect cooling performance.
The back of the case gives us some hints at the internal structure. The power supply sits on the bottom in this case. At the top are two openings covered by rubber, through which you can insert your external water cooling tubes into the system. We also find the lone 120mm exhaust fan on the rear panel, which of course will be supplemented by any power supply fans.
Interior
The side panels are attached with three screws; once these are removed, you need to lift up the lever to unlock the panels. To secure the chassis for LAN parties or similar gatherings, you can lock the lever with a small lock (not included with the chassis). Once you lift up the lever, the side panel releases and you can remove it easily.
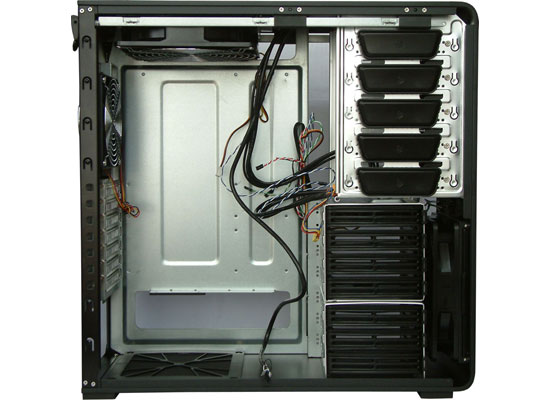
The inside shows a very sleek design with the hard drives in the bottom of the front directly behind the 180mm fan. The optical drives sit in the top and are secured with a tool-less mounting system that we will describe later. Despite the size of the chassis, there is only space for a standard ATX form factor (or smaller) motherboard, since there isn't a lot of space on the right side of the case.
Each hard drive has its own drive bay together with a plastic frame. To get the frame out of the bay you will need to lift up the small lever on the right side and pull it towards yourself. There are two main frames for these drive bays; the lower one contains three mounting slots and the upper one four, allowing you to easily install up to seven hard drives. The side of the main frame contains large openings through which the air can flow. Since a large fan is right in front of the drives, it is necessary to leave enough space for the air to come through. The drives mount backwards, which means the jacks go in first. You will need to open the second side panel to attach cables and connectors to the hard drives. You can then guide the cables through the three long openings "behind" the drive cages.


Both intake fans have a filter installed right in front of them, which is one of the benefits of the positive pressure cooling design. Both filters appear to be easily accessible and therefore easy to clean. That's especially important given the large fans, since they will move lots of air and dust. The problem is, only the front air filter can actually be removed without some extra effort. The front filter simply slides out the side, but to get at the top filter you need to remove two screws, slide the fan towards the front, and then it will drop out -- at which point you can access the filter and clean it. Depending on what components you have installed in your system, however, getting at the two screws that need to be removed could prove difficult short of uninstalling some of the other components.
It's possible to route some cables behind the motherboard tray, but we couldn't fit all of the cables back there. We managed to put the fan cables there, but the cable for the 8-pin EPS12V connector was unfortunately too thick. There's a reason for the lack of space, however: acoustic dampening foam attached to both side panels. This should reduce noise emissions, and it should be particularly useful for those looking to build silent/near-silent systems. However, it doesn't help us much when you install a high-end (and loud) system like our test configuration.
The optical drives are secured with an easy screw-less mechanism; you just press the top of the button for each bay and it releases the drive. Of course, this may not work as well with nonstandard 5.25" options like fan controllers, so be warned that the mounting mechanism is primarily targeted at full size 5.25" devices. Screwless mounting of devices is possible, should you desire.
The power supply has another large opening right below it, which is good if you are running a power supply with a fan on the bottom. Silverstone also includes a filter here, which will help reduce dust buildup inside the power supply (at the cost of some airflow). It also means the power supply should run cooler, since it will have direct access to a fresh air supply. If you use such a power supply, it will not facilitate cooling of the main compartment, but the positive air pressure within the chassis means that shouldn't be a problem. That doesn't apply for users running a power supply with an 80mm fan, but we would generally recommend against that for this particular case.
Installation
The hard drives fit nicely into the small plastic frames. There are small rubber grommets that work with the special screws that come with the case. The drives will be isolated from the chassis since they don't touch the frame directly, which should reduce vibrations and noise. After installing the hard drive(s) into the frame, you can easily slide it back into its final position inside of the case.
While the case looks very large from the outside, it's surprising how little extra space there is around the motherboard area. You will definitely want to pay attention to what you're doing during system installation. Everything fits okay, but depending on your choice of motherboard you may have a few areas that cause difficulty. Other areas present far fewer problems; optical drives are easy to install: slide them in and push down on the button. That will extend two little pins into the holes where screws normally go. However, you will need to be careful when you connect the IDE and/or Molex connector; if you press too hard the two pins will not hold and the optical drive will most likely fall out of the front.
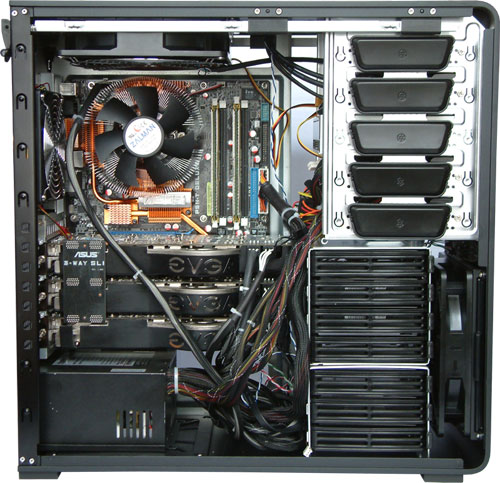


The CPU cooler sits directly below the top 180mm fan, so it should have plenty of airflow and good temperature results. The rear 120mm exhaust fan supplements airflow for this area, so it's entirely possible to go "fan-less" on the CPU. Our three GeForce 8800 Ultras fit nicely inside the case even though there isn't much space to the right. All of the cables from the power supply also need to pass here, which will make this area rather crowded and airflow will definitely be better if fewer cables are at this position. Power supply length will not be an issue in this case, as there is enough space for even the longest units with a little more than 20cm clearance.
The only problem we had was with the SATA connectors on our motherboard. Since the motherboard we use has angled connectors, there is very little space between them and the chassis. If you intend to use all of your SATA ports on such motherboards, it will be difficult but not impossible to install the cables properly. On some motherboards, you might get lucky and the three long openings to the right will line up with the SATA jacks, allowing you to pass cables directly to the hard drive area. However, our motherboard had part of the frame in front of the jacks, which made this impossible. (The use of SATA cables with angled connectors is another option.)
Test Setup
| Test Configuration | |
| CPU | Intel Core 2 Extreme QX6850 (Quad-core 3.0GHz, 2x6MB L2, 1333FSB) |
| Motherboard | Asus P5N-T Deluxe |
| Graphics Cards | Triple-SLI NVIDIA GeForce 8800 Ultra |
| Memory | 4GB OCZ DDR2 PC2-8500 Platinum Series |
| HDD | Western Digital WD4001ABYS (Fully equipped) |
| CPU Cooler | Zalman CNPS7700 |
| Power Supply | PC Power & Cooling Turbo Cool 860W (AnandTech Edition) |
For the temperature results we decided to attached temperature diodes to the CPU cooler, the GPU cooler (first GPU), the hard drives, and the inside of the chassis. This configuration may or may not end up being similar to what you run, but since we will use the same hardware in our case reviews we will be able to build a collection of results. The first graphics card in an SLI or triple-SLI setup always runs hotter than the others, which is why we will take measurements from this card.
For the time being, we installed the maximum supported number of hard drives (seven in this case). However, the temperature diode will also be connected to the first hard drive of our RAID setup. The fourth diode is in the middle of the case at the height of the DIMMs. This diode will allow us to measure ambient case temperature, and we will test optional configurations as necessary -- i.e., if a case offers a special air duct we will test both with and without this air duct.
Note: You will notice that we are testing with a very high-end setup for now, which is not representative of many computer systems. We will add a second more reasonable configuration in the future that will focus on reducing noise levels. For now, the temperature and noise readings should be considered something of a worst-case scenario; we will retest this case and others once we have additional hardware selected.
Temperatures and Acoustics
We measure the temperatures and acoustics at two different settings: idle and load. For the idle test, we leave the PC sitting at the Windows desktop without any additional running programs. We let the system idle until temperatures stabilize (around 30 minutes) and then take our temperature readings. For load testing, we run the Fur Benchmark for the graphics cards and BOINC for the CPU. In general, the temperature stabilizes after around 20 to 30 minutes, but we run the load tests for 60 minutes and take the highest temperature during this time.
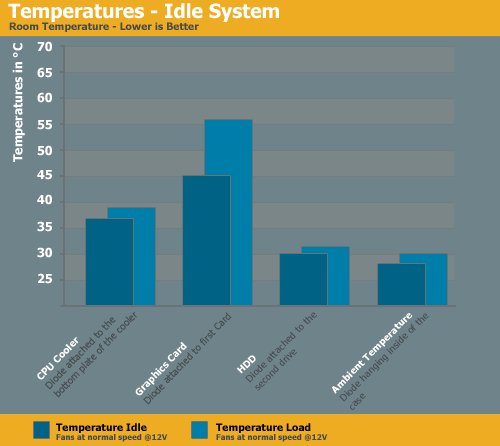
The CPU cooler has an easy job this time with premium airflow directly from above. However, the graphics cards have a more difficult job keeping cool, since there is no fan on the side panel and there are obstructions between the graphics cards and the intake fans. We see the results of this particularly at higher loads; the graphics cards do okay but definitely don't stay cool. Then again, high-end graphics hardware like this tends to run hot at full load.
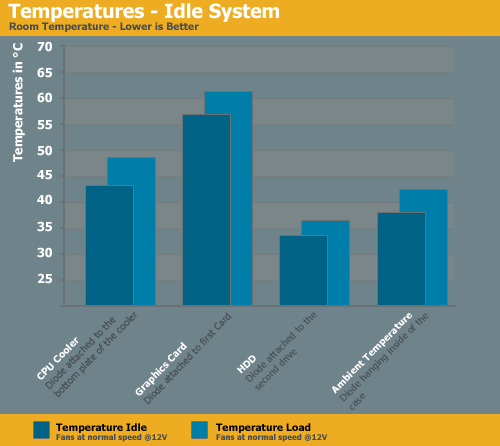
So what about reversing than directions -- does the Silverstone marketing touting the benefits of positive pressure cooling show up? Compare the two temperature graphs, and the answer is a resounding yes! Besides the fact that reversing the top fan direction required a fair amount of effort, there's absolutely no good reason to change the orientation. Couple in the added benefits of reduced dust accumulation because of the filters, and we have to agree with Silverstone. You may not see such dramatic differences on other cases, but the Fortress FT01 definitely works well in the stock configuration, and modifying the fan arrangement appears to cause more harm than good.
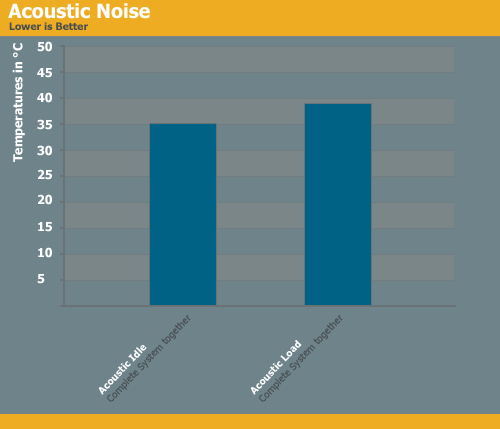
As mentioned already, the current test system definitely is not designed to eliminate noise. As such, most of the noise output comes from the fans on the graphics cards. The fans on the Silverstone Fortress FT01 are not connected to a fan control, so they always use 12V. However, in subjective testing we felt that the case fans were very quiet and should not present a problem for users looking to build a low noise system. Again, we will investigate this further in the future with a different test configuration.
Conclusion
Silverstone produces high-end chassis, and the build quality of the FT01 is virtually impeccable. There are no sharp edges or other areas of concern. Building the main body of the case out of a single piece of aluminum also creates a more rigid structure, allowing Silverstone to eliminate that pesky crossbar that often detracts from a clean interior. This case is sleek and very simple, and something people more inclined towards conservative appearances will appreciate. Those who love flashy cases on the other hand will want to look elsewhere. The overall looks and mostly screw-less design are very nice, and Silverstone did a great job designing this case.
That's not to say that we don't have a few complaints, but most of these are minor. We like the top-mounted ports for the most part, even if the depression will collect a bit of extra dust. Moving to the interior, the difficulty of accessing the dust filter on the top fan and the potential for conflicts with SATA connectors on certain motherboards are areas that could be improved with small changes.
Most of the internal design works well, but particularly on high-end configurations with multiple hard drives and graphics cards it is easy to end up with a cramped configuration. Users of extra long graphics cards will want to remove the top hard drive cage, but if you plan on such a system, we generally would recommend looking at larger full-tower cases. Also, note that the case is only capable of handling up to ATX size motherboards, so if you might want to use an EATX motherboard you will need to select a different chassis.
The case features a mostly tool-free design. Installing hard drives requires the use of screws on the hard drive cage, but cage itself slides and locks into place without any additional screws. Optical drives mount easily without the use of any screws or tools, although you can add screws if you prefer. One area where you will need to use screws is the expansion card slots. However, we don't really have any problem with this, as securing heavy graphics cards using potentially flimsy plastic clamps is less than ideal.
Airflow is another area that brings a few potential concerns. For example, the hard drive mounting structure is nice, but it blocks a lot of airflow from the front fan. The hard drives to stay at a reasonably constant 30°C; that's good for people running large RAID sets or similar configurations, but it's overkill for anyone running a single hard drive. Temperatures in the rest of the case are very good, with the CPU only increasing a few degrees at full load. The large 180mm fan directly above the CPU definitely helps here, but the graphics cards seem to struggle a bit more since they don't have any direct airflow. Silverstone intends for the front fan to cool down the graphics cards as well, but the hard drive cage and cables that run through the area make it difficult for this to work in practice. The result is that the cards need to be cooled with leftovers from the top fan, and this may not be sufficient for a top-end system running at full load.
That may explain why reversing the direction of the top fan hurt temperatures so much; as it stands, it seems like very little of the airflow from the front fan reaches the main body, so the top fan really needs to be an intake fan in order to provide fresh air for the CPU and graphics cards. In fact, during our stress test modified than configuration actually resulted in a system crash after 30 minutes. If you only use a couple hard drives, we would recommend removing the extra hard drive mounting cages to improve airflow from the front fan.
The dust filters in front of the two intake fans are a nice addition, and they are definitely necessary as 180mm fans can move a lot of air. Even during our short time of testing, we noticed quite a lot of dust buildup in the filters, as well as on the chassis grille. Some of this can be wiped off easily, but you'll probably want to clean the filters at least every couple months.
The noise dampening foam on the side panels is an extra that may or may not benefit you. If you are building a quiet system, it should help reduce noise levels from internal components, particularly hard drives and motherboard fans. It doesn't make as much of a difference on allowed system like our test configuration, however, and the added thickness of the foam interfered with routing cables behind the motherboard tray.
Prices start in the U.S at $199 at Directron, with other locations charging closer to $250. In Europe the prices start at 170€, which is about the same price as in the U.S but includes tax. For a sharp looking full aluminum tower like the Silverstone FT01, around $200 is a good investment for a chassis that should last a long time. The case is more than capable of running a triple-SLI setup, although that's probably not the primary market. If you run a lower configuration, you should be able to get much lower noise levels and temperatures.


